
I’ve owned my Kurzweil K2500SWx since shortly after it was released in the summer of 1998. It’s always been my primary controller keyboard for the studio, usually sitting between the monitor and the computer keyboard tray. When I lived in Japan for two years, it was the only synth to come with me; the rest went into deep storage or were loaned to friends. I find its VAST architecture very flexible, and it’s still nice to have a hardware sampler, even if it’s limited to 16-bit 48kHz.

Waynemanor Studios 2.0, circa May 2010.
So it’s no surprise that it’s had a few mishaps over the years. And while Sweetwater graciously offers “lifetime free technical support,” there’s the hassle of shipping the unit across an international border, and the scarcity of parts to deal with.
This holiday weekend I fixed 4 nagging problems: a digital jitter, a failed front-panel button, failed aftertouch and a fading front-panel display. Here’s how, since it took me a while to research and maybe you’ll need to do it yourself someday.
digital jitter
I had been hearing some low-level LSB jitter noise coming out of the AES/EBU output. Apparently, replugging all the internal connectors to the K-SMP sampling board, tightining the screws holding it in place, and ensuring the grounding bracket made good contact with the aluminum rail was all that was necessary. I love easy fixes.
dead button
About 4 years ago a can of ginger ale I had sitting on the desk sprung a pinhole leak on the side. About 1â„3 of the can ended up all over the K2500, spraying from C4 up to C6 and all over the buttons too. When it dried out, I lost my left arrow key. I’ve been surviving by cycling through options to get back to the left column!
While I had the unit apart, I de-soldered the “left” button using my favourite tool ever, the DEN-ON SC-7000Z. I tried soaking it in rubbing alcohol, then water, but it didn’t help much. Turned out filling a sewing thimble with contact cleaner, putting the button in, then “working” the button with a screwdriver a hundred times or so fixed it right up. Yay, I can navigate menus again!
When you disassemble the front panel to desolder a button, be careful. Popping out the plastic parts can break the little standoffs that hold them into the circuit board. If this happens, don’t worry about re-gluing them or sourcing replacements. Instead just assemble the front panel upside down, placing the button plastic in the hole first, then carefully laying the circuit board down over it.
failed aftertouch
Right after the dreaded ginger ale incident, I disassembled the keyboard and removed the keys to clean them. (Pro tip: Use a bamboo chopstick to remove and replace each key’s spring by sticking it in the top hole, pressing down to release the bottom spring catch, and pulling the top of the stick towards the front of the keyboard to free it.)
When reassembling, I pinched the aftertouch ribbon cables (here, in a K2661) between the key bed and the pitch/mod end block, breaking the connection inside the ribbon cable and destroying my aftertouch. I was ferociously upset at myself over it; every time I’d see the unit it would sit up and scream “YOU DID THIS TO ME!”
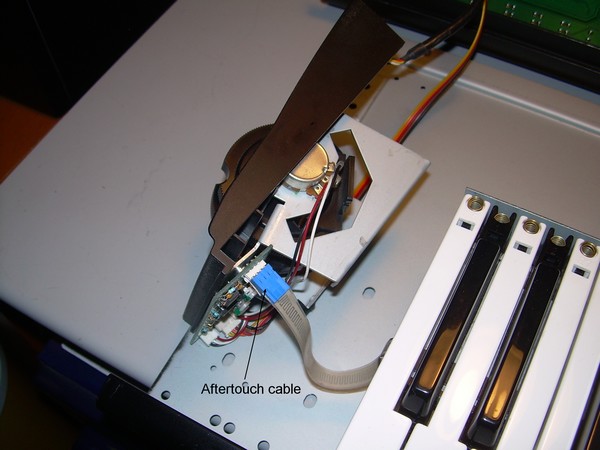
Capacitive aftertouch “Flat Flex Cables” are basically 4 layers: a top plastic layer, a “zipper” layer of extremely thin aluminum foil, a striped layer of low-conductivity dielectric, and a bottom plastic layer. In the K2500 Fatar key bed, this is topped off with a thick layer of felt, against which the key lands when pressed down. I initially tried repairing the break with some conductive paint, but as the cable flexed to be installed, the paint flaked off – not useful. I then tried brute-force soldering some wires to the foil-and-plastic assembly. This worked for about 5 minutes, then it too succumbed to flexing. Worse, each time I worked on the cable, it started delaminating, breaking aftertouch farther and farther up the keyboard.
After years of sulking and unhappiness, a friend suggested I should just attach a new connector. FCI’s 66226-004LF is exactly the right part. Trim the ribbon cable straight, insert into the connector, press hard on the metal bits to get them to puncture the ribbon cable, then fold down and lock the blue tab in place. To connect the ribbon to the wheel assembly, I made a short jumper cable out of an old Molex-to-floppy drive power adapter I had lying around. Because the aftertouch delaminated underneath the keys, I cut a notch in the felt for the new connector and its wires, and was sure when crimping it to position it so that the edges of the keys wouldn’t land on the connector itself. The connector is just small enough! On my keyboard, that placed the connector precisely underneath D1.
I then needed to calibrate the aftertouch sensitivity. Turn on the K2500X, let it fully boot, then press 4-5-6 all at the same time. The machine’s now in diagnostic mode. Play any white key on the keyboard and apply pressure. You will see the display show the pressure reading, which ranges from 0-255. Right underneath the pitch/mod wheel block there are 5 holes for sensitivity; the piano-keyboard side vertically adjacent two holes are white and black aftertouch sensitivity.
fading display
The K2000 display has an electroluminescent (EL) backlight, notorious for failing after as little as 5,000 hours of operation. The K2500 used a newer cold cathode fluorescent lamp (CCFL), the sort used in LCD panels up until a few years ago, but it too can have a short lifespan. There is a coarse CONTRAST adjustment knob inside the unit on the Audio Scanner board, but it’s a band-aid; eventually, the EL or CCFL gets too dim to be useful and your display is unreadable without very bright work light.
Fortunately, Newhaven Display makes the NHD-24064WG-ATMI-VZ# (specs here), a fully compatible display assembly with a white LED-powered backlight rated for at least 25,000 hours of continuous use. Here’s the new display with the ribbon cable from the original display soldered on:
 As I had to replace the K2000 display unit, I decided to also replace the K2500X’s display and get some future peace of mind along the way. Two modifications to the K2500/X were required to make the replacement display work. First, the new display is a bit shorter and narrower. I cut a small adapter out of a piece of ABS plastic, to which I mounted the display before attaching the display in the machine. Depending on the thickness of your adapter, you may need standoffs to hold the display closer to the acrylic bezel. You could probably 3D print something similar.
The other mod is the backlight power supply, which needs +3.5V instead of the high voltage required for a CCFL. The good news is that a dedicated, regulated +5V was incorporated into the backlight board for the high voltage transformer, and you can remove the old high voltage transformer in the process, eliminating the high-pitched squealing that annoys your children, dogs, and adults still acting like children.
Given the ~80-100 mA draw of the backlight, you will need to use a ~15-33Ω voltage-limiting resistor between the 7805 regulator and the +3.5V input on the display. I measured my unit at 75mA, so used a 38.5Ω 1% resistor I had on hand. I desoldered the transformer, adding in a jumper wire between pin 2 of the 7805 and the old pin 2 of the HV transformer, then the resistor between pins 1 and 3 where the old transformer used to be. I then removed the molex connector and cable from the old display’s power connection, severed the jumper between pins 2 and 4 in the connector (preventing the floating ground output of the 7805 from being shorted to actual chassis ground, passing 10V instead of 5V), and connected pins 1 and 3 to the new display. When wiring the connector, pins 1 and 3 were conveniently pre-marked red and black on the connector itself, which helped me not make a mistake. Here’s a picture of the changes to the backlight board:

Removing the plastic bezel from the old display was a pain, the double-sided sticky tape they used is quite strong. Go slowly with an X-Acto knife and you’ll be fine. I nicked some of the black paint along the underside of the bezel, but it easily touched up with some black nail polish. I bet model airplane paint would work fine, too. For reassembly, I attached the display to the front panel, then pushed the bezel through the front; this seemed easier than trying to get the bezel stuck on the display in exactly the right place.
 This was all good practice for my K2000R, suffering from the same issue. I’m planning on selling it in the next few months, and it only felt right to fix the problem first. When I get to that display’s replacement, I’ll post the results here.
Dear,
Thank you very much for writing this all down. I more or less had some same problems, trying to fix things but in the end worsen them…and then repeating to myself never to mess with such things again.
I ruined (made worse) my display trying to slide the back panel a bit to one side because parts of some digits ended up outside the displayfield.
Anyway, your section about the display is very helpful to me as are the others…to become more of a repairsman myself :>
Thank you and kind greetings from Holland,
Roelf Staal
My pleasure, Roelf!
These repairs are doable by someone of intermediate skill, but you will want access to a good workbench with sufficient tooling to make the job easier.
Certainly, if you don’t feel you have the skill or tools, do not attempt such a repair on your own. I can recommend servicing gear you don’t care about, such as a cheap Casio keyboard, to learn technique – or make friends with a Dutch repair person near you. :)
It was very gracious of you to share your Kurzweil repair story . where in a world of hooray for me and the hell with all others it was refreshing to see. I currently have a K2661 for about 9 or 10 yrs & I have had only one problem . and that was today ?
while editing sequences I deleted the last of many from Ram objects when it suddenly shut down ? I was surprised by it but I guessed it was flushing it self by rebooting ? Next the cycle continued and looped the boot page ? And then again ?
So I waited and I hit the soft reboot bottom row on key pad keys to reset , but it continued to loop the reboot page. So I thought it maybe tired I’d been playing & editing for the past week a few hours a day reading myself for a seldom visit by my oldest son . haven’t seen him for 2 yrs but I talk with him often & have been bragging about my Kurzweil and had even played him a few sequences over the phone via AKG 240’s next to mic on cell phone works as good as you’d expect with the limited Audio quality (a few try’s gets the levels set ) So he’s engaged & wants us to know his future wife so they’re coming & his bragging on me has caused me to scrape off the rust from my fingers, wrist, elbows OIL Can please ?
And suddenly my favorite beast has to take a vacation ? You little hmmm. Not that I’m unaware of gear going bad I’ve been playing for 40 yrs. I have also worked as a product specialist for many Keyboard makers and many other pro audio product lines. As a traveling regional sales manager aka ( a Rep-tile ) and I’m not a name dropper Oh yes I’am but that’s like us all in the music industry cause its who you know and it helps when you can also walk the talk. But it’s just that it happened the night before & I’m not in the tear down mood with a few hours left til show time.
Your studio looks great & I must tell you there’s nothing wrong with the equipment you currently own even if it was 12 bit. if it works and you love it god bless you man keep it . I used to trade up constantly, yes i somewhat needed to seeing as I was the go to guy but looking back I was an ass to give up much of that gear and today all these idiots are looking for that era of keys ( sorry kids a Wurly is a hunk thank god for it back then but its output inpedence is miss matched & will cause you line noise a/c hummm and it also acts like an antenna when close to a guitar with hot pick up’s will give you a therim like effect the keys cause your wrists to cramp, tuning is a real pain in the ass until your 20th time at it. And honest to god you can recreate it with any Kurzweil back to the pro76′ k1000 days. Plus patches for all modern day gear anything in the past 20 yrs all are re-packaged with the addition of many extra’s most guys never learn to use making them want a the newest Motif silly crap who needs a TURNTABLEIST in a band combo group ?
Stupid kids they all want to make music with out the greif of learning to play ? its not a Gamer’s job to make music redundant Hip Hop shit looped sampled looped & lied about You won’t get any extra gold coins or be able to add your name to the highest score award list when you’re done. Yet the keyboard makers believed it was a trend that they must address ? We already had that it’s called a Linn drum machine aka make by Akai ? and it’s been around for more than 30 yrs like Mike mac Donald of the dobbie bros said what a fool believes ? Don’t get me wrong there have been some great keyboard products made designed over the last 15 yrs. Korg has had huge wins here in fact so much so that the orginators of the best gear ever Tom Oberhiem , RayKurzweil, Uncle Bob Moog God rest his soul a extremely kind & generious man he was, Dr Roger Linn , Dave Smith, have all made come backs despite their wrongful doings sold out long ago during the Yamaha DX craze sold all their secrets to Roland Yamaha Korg Kawai Akai and others. Its why these new ventures seem all very similar. Truth is they trully are all copies of one another just the Software differs between them. And taking a cue from the PC industry remember 486 SX damaged goods don’t find their way to the scrap heap every body’s learned to play the trickle down game.
Example DW 6000 / DW 8000 Korg ruined the resale value by bringing out the Dw8000 to quickly its a numbers game if we flood the dealers with inventory they can’t buy the comp. Remember the Peavy keyboards ? guess who made those ? Ensonqix ring a bell design Engineers also except better paying jobs if offered enuf $$ and freedom. But look how many great Keys have been lost by all this stupid juggling and positioning Voyetra sound cards the owner had a geat synth but lost his ass during the MIDI retro fits due to a connector issue & who wouldn’t love a korg wave station today or a Prophet 5 or Prophet VS or an Aliesis Q6 Qudra synth ? i think they all have their place with exception of course DX 21 and the rest even Kawai had the me too problem thought that Yamaha & Casio where a threat to them we need to make consumer level Best Buy crap the little toy keyboards ?
and based on that lost all the momentium built up fron the K3 K5 K4 hits and sat on several new designs as they awaited the cash to flow in from some christmas gift toys ( all the eggs in one basket syndrome ) looking for Gold ?
How many kids do you think went on to be come pro’s because of a shit toy keyboard gramma got em at K;mart oh oh I need to spend 10 plus yrs taking Piano lessons so that I can make $100 a night playing in bars & strip clubs ? Sure u do ?
And its a lottery ticket to the unemployement office? What skills do you have sir ? Well I’ve been an entertainer for over 25 yrs I’ve played from coast to coast sometimes on cruise ships ? Played with many big names and others that were better players but weren’t so marketable ? You know they looked goofy or had a funny way about them ? Like the rest of the music industry there’s only so many golden candy bar wrappers they make per yr & i never got lucky enuf to get one ?
Oh you you’re a quiter ? no what gives you that idea ? Why are you here looking for other work ? Hmmmm lets see i have no retirement plan or health insurance & my kids hate me so do each of their mothers ? 6 kids & 6 exes ok Mrs nosey ?
Like I started saying we have struggled and eeked by long enuf for someone with some sanity to fix this problem. Guys like you should be able to earn a decent wage I hope you too built your studio as another source of income ? right ? we think we can help the others want a bee’s with a step up & teach them that which we’ve learned from. But Tasam will build a studio in a box that costs $150k with out board gear not including the building for $400 retail ? No wonder we couldn’t get a break every one was wroking against our path to success. How many hours have you spent on that studio set up wiring gear learning to use the gear only to find better stuff next week that does 10x the job ? How may mic’s & stands and the list is never ending ?
Thanks for listening do get to interested over the new shit ? some of it is great but most of it is just the way the engineers stay busy until the next great Trition or R3 Along comes Mary ? from the bank ? we need to repo ? hey lady i have a bunch of hell’s angels in that strudio right now help yourself … oh it’s not that important why don’t you go repo AIG or one of those big boys with the real debt ?
Good Luck with all your future projects may god watch over you & yours
best regards Rick Caruso synthesist
hi, can that flex fail all together? I’m getting an open circuit on mine and zero resistance. no obvious kinks and the its in great shape visually. The black strip has more kinks but that gives me resistance and it works.
If you’re talking about the aftertouch sensor, it’s a capacitive element, not resistive. Check for variations in capacitance as you apply pressure to it.
hi, i’m pretty sure its a variable resistor and thats what the prevailing opinion seems to be too. I get resistance increases when i press down and the fault was a ‘folded’ over strip, and have jumped this and now have aftertouch. I think the problem arises because of the ‘excess’ strip they have coming out from underneath the keybed, which can get caught and bent over. I have also fixed the aftertouch on my SY99, just. You can use a DVM on continuity to check the strips. Its easier on the Sy99 as the carbon is exposed at the end and on the Fatar keybed you just need to push down on the flex or gently remove some of the plastic. Here is the fix on my SY99 and i’ll put up the fix for the Fatar later:
http://obsoletemachines.com/2015/06/14/yamaha-sy99-aftertouch-repair/
Ps. i tried just pinning jumpers to the contacts on the strip but it was no good and i reverted to those FCI headers which seem to make a very contact and have more purchase than just pinning it with a jumper wire.